Smart Receiving is a tool designed to automate most of the receiving process and eliminate errors that can ripple through the dealership all the way up to accounting. The current manual process involves numerous dropdowns, manual confirmation of quantities, updating prices, and is prone to errors. Smart receiving streamlines this process, making it faster, more accurate, and easier to train new employees.
In this document, we will cover the following topics
- How to enable smart receiving for a vendor
- How to access the smart receiving page
- How to find and load an invoice for smart receiving
- Understanding color coding in smart receiving
- How to handle disputed parts and adjustments
- How smart receiving uses the First In First Out (FIFO) methodology
- How to complete the receiving process
- How to handle special order conflicts and reassignments
- Understanding session management and conflict prevention
- Benefits of smart receiving vs manual receiving
1. How to enable Smart Receiving for a vendor
- First thing you need to do is contact the vendor to make sure you have credentials set up to turn the integration on.
- Smart receiving must be enabled on a per-vendor basis.
- Navigate to the Vendors tile from your dashboard or Parts module.
- Search for the appropriate vendor you want to enable smart receiving for.
- Open the vendor record by clicking on it.
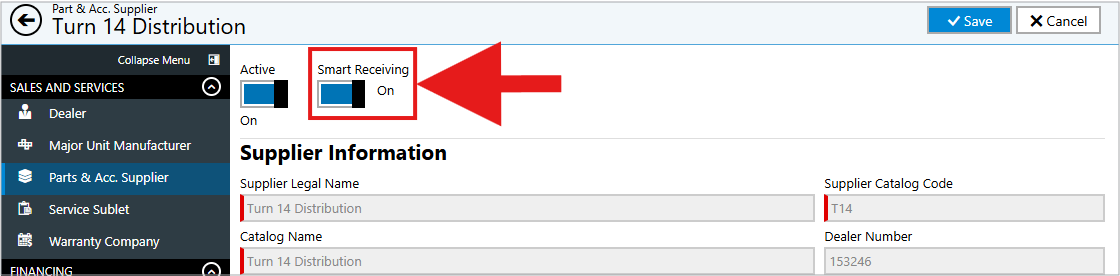
- In the collapse menu on the left, click "Parts and Accessories."
- You'll see a toggle for Smart Receiving on the Parts and Accessories section of the page.
- Click the toggle to turn it On.
- Click Save to save the vendor record.
- Important: After enabling smart receiving, you and anyone else who needs to use it must perform an application reset:
- Click on your initials in the top right corner
- Select "Application Reset" from the dropdown
- This ensures the changes apply to your session
- All users who will be receiving parts from this vendor should perform an application reset.
2. How to access the Smart Receiving page
- From your dashboard, navigate to the Parts and Accessories module.
- Click the Receiving tile.
- This will take you to the parts receiving page.
- Select the vendor you want to receive parts from using the vendor dropdown.
- Once a vendor with smart receiving enabled is selected, you'll notice the page updates and a "Smart Receiving" button appears.
- Click the Smart Receiving button to access the smart receiving interface.
- Note: When smart receiving is enabled for a vendor, the standard receiving page is now only used to manage backorders and cancel parts. You will no longer receive parts on the standard page.

3. How to find and load an invoice for Smart Receiving
- Once on the smart receiving page, select your vendor from the list.
- Click "Find Invoice."
- You can search for invoices using different methods depending on the vendor:
- Tracking Number: Usually found on the shipping box
- PO Number: Some distributors put this on the shipping label as a reference
- Invoice Date: Search by date range when the invoice was created
- For date range searches, the most recent invoices will appear at the top of the list since most orders arrive within a few days.
- Review the list of invoices and locate the one that matches your shipment.
- You can verify by matching the invoice number on your physical paperwork.
- Click on the invoice to load it into the smart receiving screen.
- The system will automatically populate all parts from that invoice.

4. Understanding color coding in Smart Receiving
Smart receiving uses color coding to help you quickly identify the status of each part on the invoice.
- White (no highlight): Parts that are for stock inventory.
- Yellow highlight: Special order parts that are assigned to a specific customer.
- Pink highlight: Parts that were NOT part of any PO in your system. This can occur when:
- You called in to add parts after the PO was already placed
- You don't use purchase orders and receive parts using "Receive Without PO"
- The part was added by the vendor
- Note: Pink does not mean something is wrong or needs to be fixed. It simply indicates the part isn't tied to a PO in your system, which is completely normal in many workflows.
- Brown highlight: Parts that have been disputed (see section 5 for details on disputes).

5. How to handle disputed parts and adjustments
- If a part is missing, damaged, or the quantity received doesn't match the invoice, you can dispute it.
- Click on the quantity field for the part in question and change it to reflect what you actually received.
- Example: If the invoice shows 2 five-gallon jugs but you only received 1, change the quantity to 1.
- When you dispute a part, the row turns brown to alert anyone reviewing the receiving that an adjustment was made.
- The "Receiving Adjustment Memo" field becomes required when a part is disputed.
- Best practice for disputed parts:
- Contact the vendor immediately to report the discrepancy
- The vendor will likely issue a credit and provide an RMA number
- Enter this information in the Receiving Adjustment Memo field
- Example: "Part was missing. RMA number 123456 will be a credit. Contact: Tony, Account #XXXX"
- The system automatically creates a parts adjustment to track the discrepancy.
- Important: The invoice summary will still show:
- Original Invoice Amount: What you were billed for
- Adjustment/Difference: The value of the disputed parts
- This allows accounting to pay the invoice in full while tracking the expected credit
- This creates a clear audit trail linking the payment to the expected vendor credit.


6. How Smart Receiving uses the First In First Out (FIFO) methodology
- Smart receiving uses a First In First Out (FIFO) method to allocate parts, which is a standard retail best practice.
- The system prioritizes parts in the following order:
- Special orders first: Parts are allocated to special orders before anything else
- Earliest special orders get priority: If multiple customers have the same part on special order, the customer who ordered first receives it first
- Purchase orders next: After special orders are fulfilled, the system looks at purchase orders and fulfills the earliest POs first
- Remaining parts go to stock: Any parts not assigned to special orders or POs are added to stock inventory
- This methodology ensures:
- Customers who ordered first are served first
- Open POs don't get overlooked and left sitting
- Parts are distributed fairly and systematically
7. How to complete the receiving process
- Review all parts on the invoice to verify quantities match what's in the box.
- Check that special order parts are assigned to the correct customers.
- Verify or add bin numbers for stock parts if needed.
- Review the accounting summary to ensure costs are correct.
- Note: Cost fields cannot be edited because the invoice cost becomes the last received cost (this is how the system is designed).
- If you're unfamiliar with cost settings, each dealership can set costs by: last received cost, average, or price book cost
- Make sure you understand how your dealership's cost settings work
- You can change the retail price if needed (for example, if prices have increased or you want to discount).
- Add part notes if necessary.
- Before clicking Receive:
- Take special order parts to the special order shelf
- Put stock parts in their designated bin locations
- When ready, click the "Receive" button at the top of the screen.
- If you use labels, keep the "Print Labels" checkbox checked. If not, uncheck it.
- The system will process the receipt and generate labels if selected.

8. How to handle special order conflicts and reassignments
- After clicking Receive, the system performs a check to see if any received parts are also needed for other customers.
- If a conflict is detected, a special order assignment window will appear.
- This can happen when:
- You ordered a part for Customer A
- Before it arrived, Customer B also ordered the same part
- You decide to give the part to Customer B instead (perhaps it's a rush or for an RO)
- The conflict window shows:
- The customer the part was originally ordered for
- Other customers who also need the part (even if not on a PO yet)
- Parts can show as "In Ordering" status, meaning you haven't created a PO yet but the part is requested
- You can reassign the part by:
- Selecting which customer should receive the part
- Clicking "Fill Special Order"
- The system will update the assignment and move the original customer back to "Ordering" status so you can reorder the part for them
- This flexibility allows you to make business decisions about part allocation without losing track of who still needs parts.
- After resolving any conflicts, stock and special order labels will print (if enabled).

9. Understanding session management and conflict prevention
- You cannot have the same vendor open in both backorder/cancel parts AND smart receiving at the same time.
- This prevents data conflicts that could occur from multiple people modifying the same vendor's orders simultaneously.
- If you try to load an invoice in Smart Receiving while someone else has the backorder/cancel screen open for that vendor, you'll receive a message indicating someone else is actively using that page.
- You have two options:
- Wait: Close the smart receiving attempt and coordinate with the other user
- Override the session: Click "Yes" to take over the session
- When to override:
- The other user went home sick or left their session open
- It's an emergency and you need to receive parts immediately
- You've confirmed no one is actively working in the other session
- What happens when you override:
- The other user's screen will display a message that their session has been overridden
- Their page will become read-only
- You can proceed with your smart receiving task
- This is existing logic in DX1 (not unique to smart receiving) to prevent vendor ordering and receiving conflicts.


10. Benefits of Smart Receiving vs manual receiving
Smart receiving provides significant advantages over the manual receiving process:
Time Savings
- Manual receiving of 40 parts takes approximately 10 minutes if done perfectly without mistakes.
- Smart receiving takes approximately 45 seconds to load an invoice and receive parts, regardless of whether there are 10, 25, or 200 parts on the invoice.
- The more parts on an invoice, the greater the time savings.
Accuracy Improvements
- Eliminates manual entry errors from typing part numbers, quantities, and costs.
- Automatically pulls accurate invoice data directly from the vendor.
- Reduces errors that ripple through to accounting.
- Prevents missed special orders that can occur with manual receiving.
Automation Benefits
- Automatically handles backorder quantities without manual zeroing out.
- No need to manually create POs for receive-without-PO scenarios.
- Automatically allocates parts using FIFO methodology.
- Creates POs automatically for parts not in the system.
- Detects special order conflicts and allows easy reassignment.
Training and Efficiency
- Much easier to train new employees.
- Reduces the learning curve for a high-responsibility, detail-oriented task.
- Allows receiving staff to process higher volumes.
- Frees up time for other value-added tasks.
Consistency
- Standardizes the receiving process across all users.
- Ensures proper handling of special orders.
- Maintains accurate cost and pricing information.
- Creates clear audit trails for disputed parts.
Important Notes
- Smart receiving must be enabled on a per-vendor basis.
- After enabling or making changes, always perform an application reset.
- The standard receiving page becomes a backorder/cancel management page only when smart receiving is enabled.
- Pink-highlighted parts are normal and don't indicate errors.
- Always document disputes with vendor contact information and RMA numbers.
- Cost fields reflect invoice costs and cannot be edited (this is intentional).
- Session conflicts prevent data errors, so coordinate with other users when receiving.
- The more parts on an invoice, the more time you save with smart receiving.
Summary
Smart receiving transforms the parts receiving process from a manual, error-prone task into a streamlined, automated workflow. By finding an invoice (usually via tracking number on the box), verifying quantities against the physical shipment, and clicking Receive, you can process invoices in seconds instead of minutes. The system handles the complex logic of part allocation, special order management, and backorder tracking automatically, allowing your team to do more with their time while reducing costly errors.